How to Deploy React Vite app to Netlify
Hello friends, In this tutorial, I'm going to teach you the easiest way to Deploy React Vite app to Netlify. We learned in our previous article Deploy vite app to GitHub pages for Free. If you don't know about it, you can check it. After creating an app, it is important to host our application on the web or the internet. There are various platforms available on the internet which are free and paid. Today we are going to host our app on one of the free platforms called Netlify.
So, let's get started!
Topic cleared in the article:-
- What is Netlify?
- How to create a react vite app?
- Deploy React vite app to Netlify using Netlify CLI
- Manually deploy react vite app to Netlify
What is Netlify?
Netlify is a web hosting and automated platform that enables developers to host static and dynamic websites, web applications, and e-commerce apps. It gives both free and paid services to host websites and web applications. You can also host deployed GitHub repositories on Netlify. You only need an account on it. If you didn't create your account on it, create your account first.
Creating a React Vite application
To host an application first, we need to create it. To create a vite application run given commands into your terminal. For a brief tutorial, you can also see our tutorial on How to create a react app using Vite js and tailwind CSS. Or you can run these commands.
npm create vite@latest
Now enter your project name on the terminal. And select React in frameworks.
cd project-name
npm install
npm run dev
After creating the vite application, create your project. When you finished your project build it by running this command into your terminal.
npm run build
After running this command, you will see a dist folder in your
current project folder.
Now it's time to deploy react vite app to Netlify.
We can deploy our application in several ways. Let's see some of them.
Deploy react vite app using Netlify CLI
Creating Netlify website
To deploy the vite app using CLI, we have to install it. We going to install it globally. Enter the given command into your terminal to install Netlify CLI Globally.
- Install Netlify CLI
npm install -g netlify-cli
The first time, you should have to log in through your terminal. Skip this step if you are already logged in.
- Log in to Netlify using cmd.
ntl login
After entering the above command, you will see this in your terminal.
Now this will redirect you to a Netlify authorization page. Login to that page and come back to the terminal. After logging in through the terminal, you can deploy the app Netlify.
- Initialize your project.
ntl init
Do you want to create a Netlify site without a git repository?.
You should select Yes, create and deploy site manually. As shown
in the image.
- Now select your team. If you didn't create a team, create one.
- Enter your project name. Try to enter a unique name.
Deploying project to Netlify
To deploy the project to this site. Run the given command.
ntl deploy
After running this command, it will ask you
Please provide a publish directory (e.g. "public" or "dist" or ".").
Enter dist here.
Then it will give you a draft URL to check everything is good. Check the draft URL. If your website is deployed correctly, then deploy it to the main site URL.
ntl deploy --prod
Again it asks for publish directory. Enter dist again.
If you see the result as shown in the image. Your website is deployed.
Click the URL and see the result. We deployed react vite apps to Netlify using CLI.
Now let's try to deploy it manually.
Deploy React Vite app to Netlify Manually
If you don't want to deploy the vite app, it is possible to deploy react vite app manually. You don't need cmd knowledge to deploy it. However, the best practice is to deploy apps using CLI. To deploy react vite app to Netlify manually, follow the steps one by one.
- Go to the dashboard of the Netlify website.
- Click the "Add new site" Button.
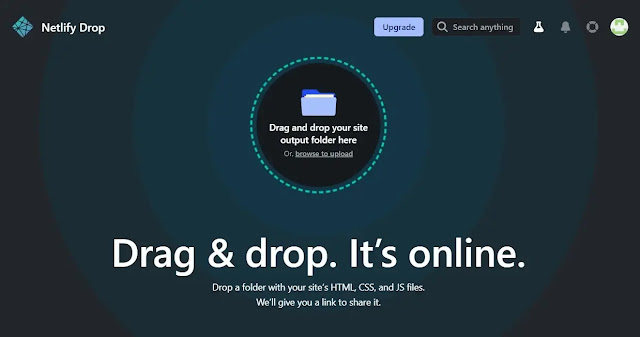
- Select "Deploy manually".
dist
folder. If your project does not have a dist folder.
Create it by running npm run build.
Drop the dist folder here. After a while, your website is ready.
By default, it gives a random name to your website. But you can change it from site settings.
Conclusion
Hurray! we learned How to Deploy react vite app to Netlify. Now you learned a new method to deploy your react application. It is important to deploy and host our project on the internet. It boosts your portfolio impression as well as your value. Try to practice new projects and deploy them to online platforms.
If you learned something new from this article, share it with your friends. Also, tell us in the comment section. If you have queries feel free to contact us. We try our best to resolve your problem.
You can also request tutorials on any topic related to web development. Just tell us in the comment section and it happens within a week.
Thank you!


